Friday, July 9, 2010

About Creativity

Creative is a human’s ability that can make something real and new based on their idea. So what I expect from this class is we know about what the creative is and what I should do to become a creative person.

Well, first class we learn about what we can’t become the creative people. The answer is because of the “myth of creativity”. That is right; the one that can bar our creativity is our negative mind. Let’s say we have positive thinking that we can be a creative people, so it can push you to reach your maximal ability to be creative.

I found this quote

“If it doesn't sell, it isn't creative”. David Ogilvy

This is the way we are thinking but, we can’t just judge this quote wrong. We can say this quote is also correct. If we want to think about it, it’s correct because when we are not creative, we cannot sell our art work. Isn’t it? On the other hand, that quote can be false because creative doesn’t mean to be precious. If we think about money that, can be one of trouble to reach our max creativity.

Saturday, May 2, 2009

TUTORIAL

BITHDAY CARD


TUTORIAL


in this part, I want to tell you about the tutorial in step by step

first, what we have to do is draw rose. done trace from photography image. it may more difficult. we can make it simple using our draw.


this time, you can use gaussian blur effect, so it may looks so real.


then, copy and paste the read rose and arrange them like this.


next step is draw candle . and copy -paste in 3 image.


draw, its fire. the color is orange and yellow. you can set it with gradient and don't use transparent, because it may has effect to the background and other image.

draw using pen tool to fill the fire. In other word, we must combine it with the other image to make interesting.


copy paste it .
and we have a redrose before. better we keep it in outside frame. because, we need to copy it as a source.
set candle and rose like this. next, we must draw cake under the candle and rose. don't forget to create those shadow in cake using transparency.


then, next step is the background. I need white rectangle in order to make transparency to all of the rose in the back. this rectangle , is made using rectangle tool. after that, we just transparent it . and the rectangle is not only one, but 5 rectangles. I set them like this.

set the color like this and next step is make frame. I make this frame using pathfinder.


trace the word on the template. and in this part, you have to make brush style. make it like this (inside the black circle)


next step is create gift image using pentool

choose chocroal in brush brush window.

and we continue with the masking. here is 3 steps of masking that you have to do
open the batik image


create rectangle on it , and we color it like this using gradient. the color is red, but the other side must be set in opacity= 0


arrange the rectangle back of the batik. then do mask opacity.
and put the result over here. and add object to make more impresive

using previous step, we can arrange the wishing card like this. we just copy and paste from previous card. but this card, we can also create the line on the corner using pen tool.that' is the different.


after we arrange all of your card like this. the next step is put the white rectangle in the center
after that we choose chocroal for the brush style
increase the number of the stroke till 14

and make it transparent. then put the word on it.
thank you.

Final Birthday card

finally, this is my work.


DESCRIPTION

- I put local culture in the red line, because when I put in different color it is not suit so i just use the pattern to make that culture.

- red rose, I make that from vector. it's so difficult to make. this red rose means Love. That's why this birthday card can be given to person whom you love.

-gift to make this card be more crowded, because crowd is the one way to make happiness emotion

-candle makes it more interesting. we can see the fire is yellow. it's so simple but the function this fire is to make beautiful image , so it has different color on it. perhaps fire can be a main image in this card.

- Why do I put all of them in red and white color?when I put black, i cant give some happiness in the card, then I tried to give any color. but its not suit with red rose. so I put white only and I think it is best than the others color.

-finally I put that composition because of the template. I try to give same template but, it must has differences also. cake, candle, and the word must be same as in template.


Hi everybody...
I choose this template/ layout to design my birthday card.


and this is my reference


I need this picture to add local culture.

this is link for my reference

http://littlebubbly.com/images/BatikManiaGreenCloseup.JPG

Thursday, April 9, 2009

TUTORIAL

well, now i'll tell you about the tutorial, but this is just simply steps that I did before.

step 1: absulotely we have blank page here.


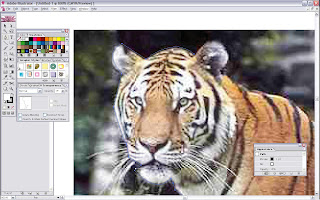
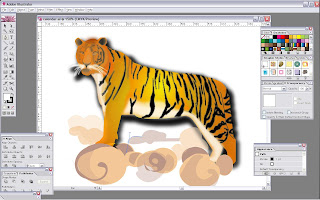
step2: The first step that we have to do is trace the tiger picture like this. in the first, we can just line it the outline of the tiger. to make it easier, you can also make just the outline. don't fill it with any color.


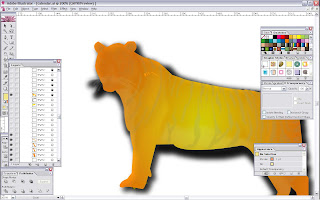
step 3: if you have finished your outline, you can start to fill the image. I fill with radial gradient yellow and orange color.don't forget to use drop shadow.


step4: then, after that you just trace the skin's pattern of the tiger. you must be careful when you trace on it's face. especially it's eyes. it's difficult to make. then continue with its body and finish it all.


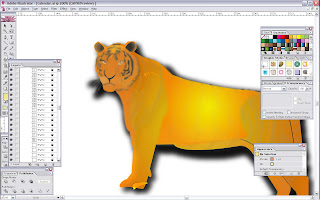
step5: I guess that blur effect can make this tiger looks real, so you can use that effect. even this blur make the image doesn't look clearly but this gaussian blur effect help us to make the tiger realitic


step 6: and give the cloud above the tiger to make it nice.


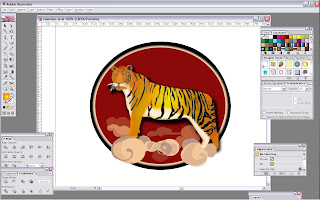
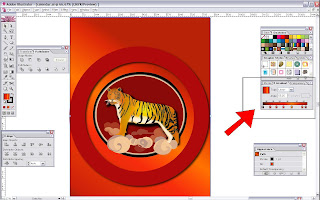
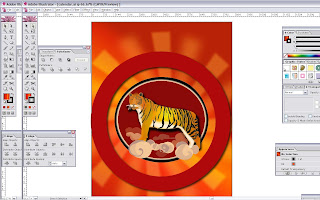
step 7: then you are supposed to make the 3 circle like this and arrange behind of the tiger. the first circle is dark red, white, and then black. then you must blur the white circle. like this


step 8: you must do with path finder. make sure your pathfinder window is exist on your page. then you must create two circle the then click this pathfinder. watch the picture above


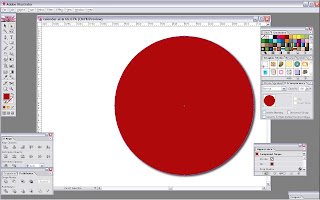
-create circle again inside the circle


-click the second button in the pathfinder. like this. and you can get your circle has a hole


-then, set up the position like this


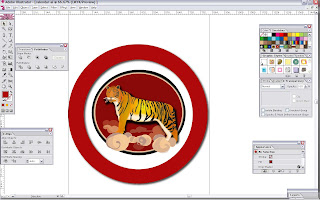
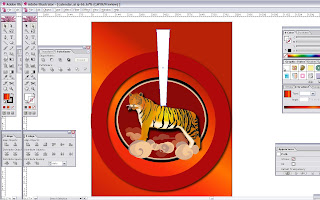
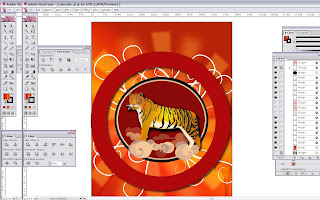
step 9: this step can be done in the first or the last. if you want to do in the last, you must group your tiger and lock all of what you've done. We want to create the background. look this several picture for the step.

-I play with the gradient. and set the color gradient like in this picture.


- make the rectangle using rectangle tool. and shape it like the picture above by pressing shift+ right click to lock the corner of the shape and do that again to release the lock.


- click the transform


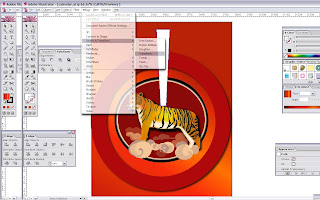
and set like this picture.


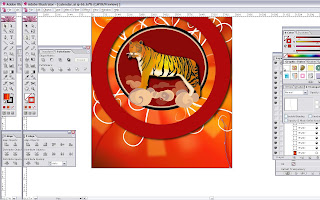
-after that. you can set the tranparancy and make it blur using gaussian blur. and make this shapes two times to become like this. the one you can set with more transparancy and blur and another one you can set with little transparancy and little blur also.


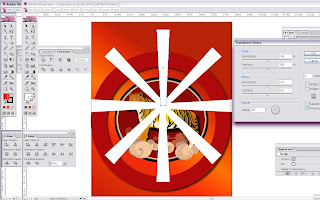
- To make crowded, we can put the "root line". make the root line using the same way with the previous line. remember , don't make it blur. and set the position like this


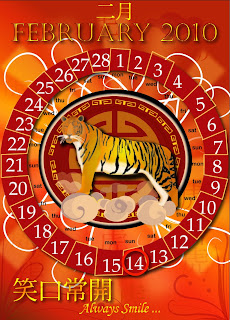
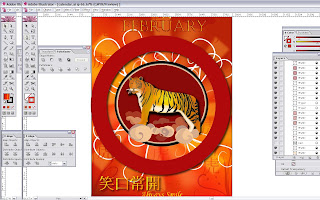
step 10: this is the last step. you must decorate your calendar with china style. you can trace it from the internet or you do by yourself using pen tool.

create the plants to decorate the calendar.and set in to red and transparancy


- write the word "tiger" in chinese word and spread them on the calendar.


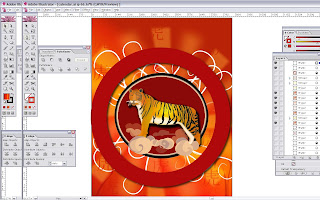
- don't forget to write the month, date, and the number of date. then better, you write some quote or exciting word to make your calendar interesting.


- so we hav finished our work. try it.


Thank you